‏إظهار الرسائل ذات التسميات custom rom. إظهار كافة الرسائل

الأربعاء، 2 يناير 2019

How To Disable Driver Signature Enforcement In Your Computer Windows 8/8.1 And Windows 10

How To Disable Driver Signature Enforcement In Your Computer Windows 8/8.1 And Windows 10

1. Today I'am Going To Show Your How To Disable
Driver Signature Enforcement On Windows,
8/8.1/10 withing a minutes or seconds.

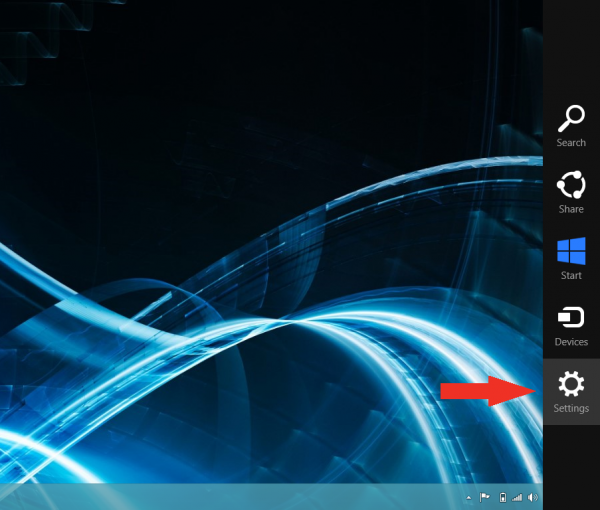
he Windows key on your keyboard and press the letter
C to open the Charm menu, then click the gear icon
(Settings).


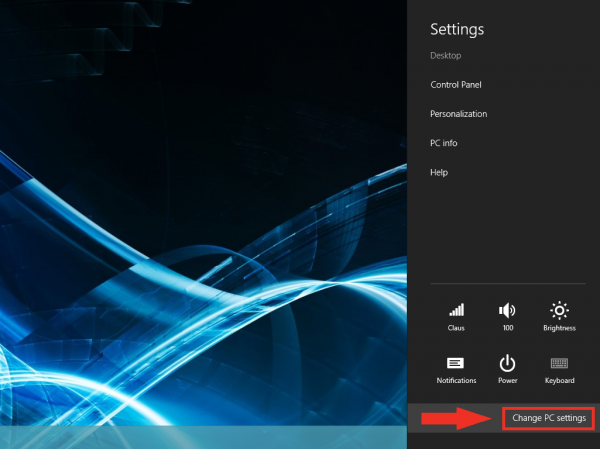
Click More PC Settings.


Click General.
Under Advanced Startup , click Restart Now.
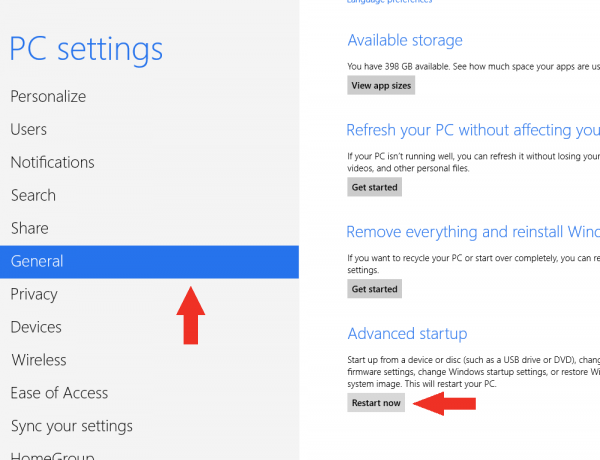


NOTE: In Windows 8.1, the Restart Now button has
moved to PC Setting -> Update & Recovery ->
Recovery


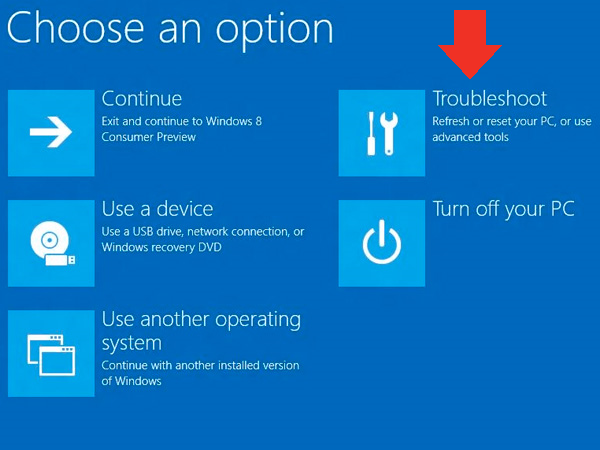
After restarting, click Troubleshoot.


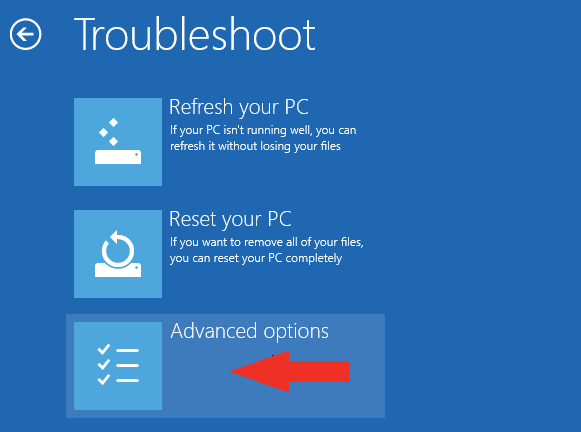
Click Advanced Options


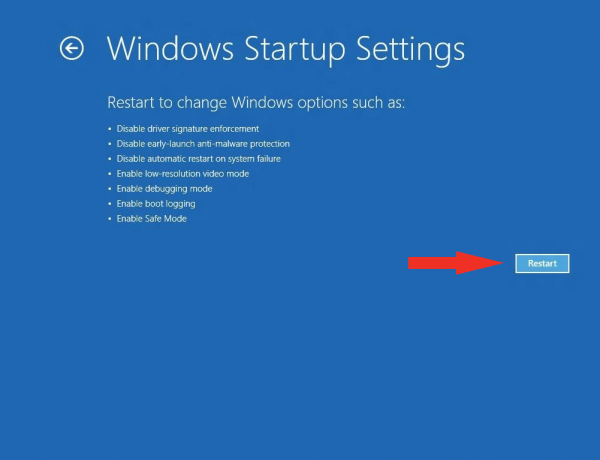
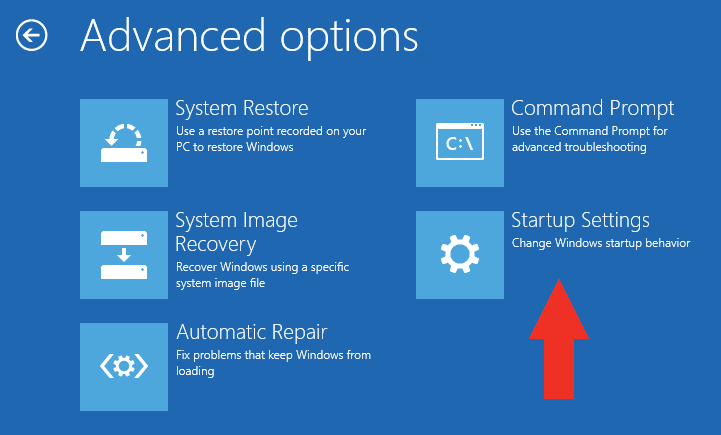
Click Windows Startup Settings.


After restarting your computer a second time, choose
Disable driver signature enforcement from the list by
Pressing the number 7 on your keyboard.


Your computer will restart automatically.

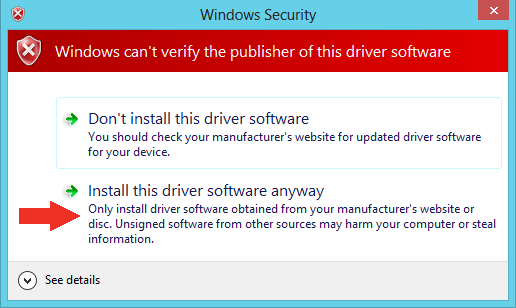
After restarting, you will be able to install the Arduino
drivers normally; however, Windows will display a
warning message. When the warning appears, click
Install this driver software anyway.


Now you can go ahead
Download and Install Vcom
Drivers On Windows 8,8.1 or 10.
How To Update Your Nexus 4 to Latest Android Naugat Version 7.0 Without Computer

How To Update Your Nexus 4 to Latest Android Naugat Version 7.0 Without Computer

.


Guys Now There's New Custom For Your Nexus 4
Namely Naugat Android 7.0, Updating list of Android
7.0 Nougat custom ROMs, En Now we are bring you a
ROM for Nexus 4. Based on Android 7.0 Nougat,
NitrogenOS brings the latest features of Nougat to
your Nexus 4. Follow this guide to update Nexus 4 to
Android 7.0 Nougat based NitrogenOS custom
firmware.

Before you update Nexus 4 to Android 7.0

Do note that this is not an official firmware, but a
custom ROM. You might experience some features
not working properly. For more details and to keep
yourself updated with the latest fixes coming to the
ROM, please visit the development
thread.


As always, before we get to the actual steps, there
are a few prerequisites that you need to take care of.


Create a backup of your data for when you run
into some problem during the process.
Make sure that your Nexus 4 has at least 80% of
battery life.

Your device should be rooted using the most
recent recovery system installed.

Its bootloader should be unlocked..

Make sure to enable USB Debugging on your
Nexus 4.


Steps to update Nexus 4 to Android 7.0
NitrogenOS...


Required files: download
NitrogenOS Android 7.0

Nougat on your PC. Also download Gapps for your
device.


Step 1:

Connect your Nexus 4 to your PC using USB cable
and copy the downloaded files to the internal storage
of your device. Power off your device and unplug
from the computer.

Step 2:
Boot your Nexus 4 to Recovery mode: press and
hold Power , Volume Up and Volume Down buttons.
Release them when you see the Bootloader or
Fastboot menu. Use volume keys to navigate and
Power button to select a choice. Select Bootloader >
Recovery .

Step 3:
Select Backup and Restore to perform Nandroid
Backup and then go back to main menu. Next, wipe
data by selecting wipe data/factory reset . Also, wipe
cache partition to perform cache wipe. Finally, Delvik
Cache should also be wiped from Advanced > Wipe
Delvik Cache .

Step 4:
Now, select Install Zip from sdcard > choose zip
from sdcard from the main recovery menu. Locate
the NitrogenOS custom ROM. Select and confirm.

Step 5:
Follow the above step for installing Gapps. After you
are done, select reboot system now to reboot your
Nexus 4. It will take some time to load all files as this
is the first boot after flashing, so don’t be worried if it
takes more time than usual.


Are you trying NitrogenOS on your Nexus 4? Tell us
how it goes for you and don’t forget to share
your favorite Nougat ROMs with us.
[Rom] Download Latest Mystic OS V7 Marshmallow 6.0.1 Custom Rom For Your Tecno Y6

[Rom] Download Latest Mystic OS V7 Marshmallow 6.0.1 Custom Rom For Your Tecno Y6

Good News Guys Here Is the latest Mystic OS V7
Android Marshmallow 6.0.1 Custom ROM For Tecno
Y6, This rom work on any Tecno Y6 with
custom recovery installed.


All what you need is files for this rom and is already
available in this post, you just have to download the
files and follow the produces.


ROM FEATURES

√ Highly graphical
√ Battery Conservation
√ New UI animations
√ New Boot animation Marshmallow
√ Performance control and time in state in Mystic
Fibres
√ Ad Blocker
√ Keyboard animation
√ Custom progress bar
√ Scrolling animation
√ 3 network traffics
√ Clock & date options
√ Dynamic system bars
√ Heads up notifications
√ Low battery warning options
√ Carrier label on statusbar
√ Navigation bar options
√ Keyboard animations
√ Weather settings
√ Double tap statusbar to sleep
√ Cyanogenmod Lock
√ CM12.1 app icons
√ Nova launcher prime default launcher
√ Android M sounds
√ Marshmallow platlogo & game
√ CM12.1 music player
√ Material themed dialer, contacts, mms , & all other
system apps
√ Floating action buttons in messaging & calender
√ Card stack recent panel
√ Stock gallery & camera
√ Based on wiko rainbow stock rom, so there are very
less chances of bugs
√ Lollipop lockscreen
√ Pre -rooted with super user
√ Busybox installed
√ ABS Tweak inbuilt
√ Better ram management
√ Better battery backup
√ ROM's size is 260 MB
√ Lollipop inspired volume panel
√ Screen record in power menu
√ 4 ways reboot options in power menu
√ Material themed Settings
√ Search button in settings' action bar
√ Lollipop status bar icons
√ Lollipop notification panel with awesome
animation
√ Flashlight toggle in panel
√ Delete button after taking ss
√ Themed framework like lollipop
√ Battery styles with battery bar option
√ Mystic Fibres in settings
√ Support developer tab in settings
√ Changelogs, rom logo, release date, etc... in About
Dark Mystic
√ Smart gestures & Gesture anywhere options
√ Font chooser
√ Engineer mod & scheduled power on off
√ App ops, autostarts & phone settings
√ Option to change lcd density
√ Media scanner on boot


r options
√ Build prop modder


Note: Your phone must be rooted to enjoy this.
Download all files in the link's below and move them to
the root of your SD card.


Step 1. Install Rashr.apk flash tool to flash/install
Twrp Recovery. Open the app, grant root access and
choose the first option (recovery from storage).
locate your twrp recovery.img file you downloaded
and boot to recovery mode.

Step 2. Click on wipe- Advance wipe
•Tick the first four, ie cache, dalvik cache, system and
data. Dont tick Sdcard
•Swipe to the right to wipe After wipe is completed
Step 3. Go back and click install. Scroll to where you
kept your downloaded Mystic os v7. Swipe right to
install
•After installation Is completed
•Click on wipe cache Swipe right to wipe cache and
dalvik cache Reboot Your Phone and your device will
be
running Android 6.0.1 Marshmallow.
Repeat.

Step 3. With the last two downloaded files ie: play
store big fix and key fix files in order to make some
improvement/ fixes on the package. ENJOY.


Mystic OS Rom


TWRP recovery for y6 Key & Keyboard fix


Playstore Fix


Thanks---

Raj Shekhar the Mystic Os rom developer for
developing an android 6.0 rom for Tecno Y6.


Source: phonetweakers
Download Material v3 Lollipop Custom Rom for Gionee p6 by elmechanic

Download Material v3 Lollipop Custom Rom for Gionee p6 by elmechanic

Hey Guys Welcome to shafinhaisa blog Here Is And
Another Suitable lollipop 5.0.1 Custom rom for gionee
p6 users we have tested it and everything is working,
and this rom specially ported from Walton
primo by BASHAR, And so far so good I can attest to
it as bein bugless, smooth multitasking, good battery
backup etc...


We all know that the Gionee P6 ain't as
popular as it's contemporary there by the
availability of it custom rom is quite rare..
Therefore necessity is the mother of invention that we
had to do this...


PROCEDURES

*Navigate to your recovery mode any of the recovery
method for those who knows how to flash custom
rom before..

*format data and wipe cache of the previous stock
rom [ please do a cwm recovery backup before
formatting or attempting to flash the Gionee p6]....

*wait for a while as the phone starts up after the
flashing [ this may take some minutes so don't fret if
the boot logo is there for a while]....

*voila flashing done and u can now
a new cool experience on your gionee pioneer p6
phone...


https://blogger.googleusercontent.com/img/b/R29vZ2xl/AVvXsEjssSuJFkXi-oSbGrzgXXJ5zv9a8C1JVxjlrAhOPTOZeMWImGVaDwvauWfcGYNet336LVhHRyG6wS54KrgRg3AUGF3MANQIqOyqJ_Z2y-4MSASC1uEO5eA46GeM0ekldbavHWWWC_u-8dw/s1600/IMG-20160214-WA0009%5B1%5D.jpg


https://blogger.googleusercontent.com/img/b/R29vZ2xl/AVvXsEgtJeMu5tVvT-fndDyvfYABLF8UylhdzavI6n_75qsaUL7PkLkuT9BTK7aoSbjtIXIm9diw-yX5N7Q8L7j1KDEgykM-42r9tprSsoyj8xmOq0SM1UB-eILsVcTefloo1LS6zslLjFuf8a8/s1600/IMG-20160214-WA0004%5B1%5D.jpg


https://blogger.googleusercontent.com/img/b/R29vZ2xl/AVvXsEgw6QRLCsz-q_87YtW1byD3hTgZ1TIxtt6CJlGwFVxTRB8-Td9qVMD0-sEaoku1Z8LCAMfODF2E7A2BcAx-MOACd9hEzBDU0KtxvCIaT9fAzvpyUX3l9Z_KwAO_aYv5pSjgZvwBihsP2iU/s1600/IMG-20160214-WA0003%5B1%5D.jpg


https://blogger.googleusercontent.com/img/b/R29vZ2xl/AVvXsEiYCA38p5NtWjPS-Q1nWFBp9n_KPMKTOYjz5prpjdkGbzRFsWDgKWX5TsrtC88pB0ezfx694UOFDNcYsdGQSpxdNHhnHt9FD8579h9XDmvs_brnRELNHkDXt5GdgQ0pXLqz9HPEpwStVE4/s1600/IMG-20160214-WA0001%5B1%5D.jpg


Go ahead and flash and let us know how it goes and
if u experience any bug or issues we can try to fix and
make it better..


DOWNLOAD LINKS
Material++v3_for_Gionee_p6_by_elmechanic.zip .


Thanks---
BASHAR DT [ported from material
v3 Rom for Walton primo GH2]


source: naijawarload
Download CM13 Android Marshmallow For Gionee P4, Walton GH2, QMobile Noir i6 And mt6582

Download CM13 Android Marshmallow For Gionee P4, Walton GH2, QMobile Noir i6 And mt6582

Hello, we have Gionee P4 Mystic Os V6 well design
with zero bug ,it have nice performance and well
Design i would like to share you some features of
these bugless Custom Rom.

BUGS

1. Fm radio not supported.
2. help me to find bug by commenting them.
DOWNLOAD LINKS
Rom Download
Gapps Download


Philz Recovery Download
Better Camera app to be flashed Download


INSTALLING INSTRUCTION

py zip to your sd or internal memory.

  • Flash custom recovery - Philz or TWRP.


  • Install it


  • After installing clear cache and wipe dalvik cache
    (MUST).


  • Download Latest Huawei P8 (UL10) B366 Marshmallow Update [Asia]

    Download Latest Huawei P8 (UL10) B366 Marshmallow Update [Asia]

    Huawei P8 (GRA-UL10) has received a new firmware
    update, version B366, in the Asian Pacific region.
    This update is based on Emotion UI 4.0.1 and
    features February’s security patches.


    Firmware Details :


    * Device: Huawei P8
    * Model: GRA-UL10
    * Android: v6.0 Marshmallow
    * EMUI: 4.0.1
    * Firmware: B366
    * Build Number: GRA-UL10C636B366
    * Cust Number: CUSTC636D001
    * Security Patch Level: February 1, 2017
    * Release Date: 3.02.2017
    fficial (stable)
    * Type: Full firmware package
    * File Name: update.zip


    Downlod Link
    Official Mirror
    | Size: 1.7 GB


    Installation:


    1. This firmware can only be installed on devices
    sporting C636D001 custom number.

    2. Download the update.zip package from above and
    extract it on your computer.

    3. Create a new folder “dload” in the microSD card
    and copy the extracted UPDATE.APP package to it.
    4. Take a full backup of all your existing data using
    the native backup app.

    5. Now turn your device off.

    6. Hold Volume down + Volume up + Power keys for

    a few seconds to start the update process.
     Latest Huawei P8 Lite (2017) B140 Nougat Firmware [Vodafone] [Europe]

    Latest Huawei P8 Lite (2017) B140 Nougat Firmware [Vodafone] [Europe]

    You can download the full B140 Nougat firmware for
    Huawei P8 Lite (2017) handsets on Vodafone Europe
    carrier network using the official download link
    provided below.


    This update comes with January’s security patches as
    well as some additional bug-fixes for the native Email
    app.


    Firmware Details


    Device: Huawei P8 Lite (2017)
    Model: PRA-LX1
    Android: v7.0 Nougat
    Version: NRD90M
    EMUI: 5.0
    Firmware: B140
    Build Number: PRA-LX1C02B140
    Security Patch Level: January 1, 2017
    Status: Official (beta)
    Type: Full firmware package
    Release Date: 16.02.2017
    File Name: update.zip


    Download Link :

    Official Mirror (HiCloud) | Size: 1.6 GB


    >:
    Click here
    | Size: 636 MB


    How to Update


    Compatibility : This firmware is only recommended for
    Vodafone based devices that are already running a
    C02 firmware onboard.


    1. Download the update.zip package from above and
    extract it on your computer.

    2. Create a new folder “dload” in the external
    microSD card or the internal memory of your phone.

    3. Copy the extracted UPDATE.APP file to the newly
    created dload folder on your device.

    4. Now open the dialer app and enter
    *#*#2846579#*#*

    5. In the menu, go to Software Upgrade > SDCard
    Upgrade > “Ok”

    6. Now download the patch file from the above-
    mentioned link and extract it.

    7. Replace the previous UPDATE.APP package in your
    phone’s dload folder with the UPDATE.APP package
    you obtain from extracting the patch file.

    8. Now install the patch file in the same way using
    the dialer method (step 4 – 5).


    Latest MIUI 8.2.1.0 Custom Rom For Gionee M2

    Latest MIUI 8.2.1.0 Custom Rom For Gionee M2


    CHANGE LOG: Search on google
    NOTE:


    Gapps included
    Prerequisites
    This rom is meant Gionee M2 only. Do not try it on
    any other device…


    •Your phone should have a custom recovery installed
    in order to install this ROM on your phone.


    CTR 2.2
    For Gionee M2


    •We will be using CT Recovery for flashing this Rom
    •This ROM will wipe out all your data. Make sure you
    backup all your data in your phone before proceeding.
    •Perform a Dalvik Cache wipe before proceeding from
    the Recovery Mode.
    •Don’t worry we are going to share step by step guide
    to safely


    •We will be using CT Recovery for flashing this Rom
    •This ROM will wipe out all your data. Make sure you
    backup all your data in your phone before proceeding.
    •Perform a Dalvik Cache wipe before proceeding from
    the Recovery Mode.


    •Don’t worry we are going to share step by step guide
    to safely

    lash Miui 8.2.1.0 Rom On Your Gionee M2
    Flashing this ROM is very easy.


  • 1. Make full data Backup before flashing


  • 2. After that download, the Custom ROM for your
    device movethe downloaded files to the external
    storage (sd card ) of your device.


  • 4. Now, switch off your device and boot to recovery
    mode (press and hold Volume Down button + press
    Power button ).


  • 5. Once you get to the recovery mode, simply perform
    a full system wipe ( Wipe Data/Factory Reset, Wipe
    Cache Partition and then Wipe Dalvik Cache/ART
    cache from advanced section ).


  • 6. After that click install, then select the MIUI 8.zip
    file and install immediately.


  • 7. Once the installation process is completed, simply
    go back main recovery menu and tap on Reboot
    system, and your device would be rebooted.
    Flash SuperSu to root the ROM
    Once your device is reboot successfully, you would
    begin to experience the wonderful and sweet Miui 8
    ROM on your android phone


  • CREADIT :

    xiaomi.eu
    Fathurahman ara
    Obaid Muneer
    janda families
    NJ
    vISHWa


    MIUI 8 6.12.1 ROM For Gionee M2