Showing posts with label Tech. Show all posts

Friday, 11 January 2019

How to Make Money on YouTube 2019 (Step by Step Guide for Beginners)

How to Make Money on YouTube 2019 (Step by Step Guide for Beginners)

Steps on how to make money on
YouTube


Step 1: Setup and build your YouTube
channel


Your channel is your personal presence on YouTube. Each
YouTube account has one channel attached to it. A YouTube
account is the same as a Google account, and creating a
YouTube account will grant you access to other Google
products, such as Gmail and Drive.

Create your account or use your existing one. Add keywords to
help people find your channel.

You can add keywords by navigating to the Advanced section
of your Channel Settings. Make sure that your keywords are
relevant to your content .

Your username can also work for or against you. If it’s short,
easy to remember, and original, people will be more apt to
remember you.

However, if you are using an existing account, you can always
change your username by editing it on your Google+ account.
Creating a YouTube channel using your Google account If you
have a Google account, you can watch, share YouTube content.

But you need to create a YouTube channel to upload videos,
comment, or make playlists.

You can use a computer or the YouTube mobile site / App to
create a new channel.


Here are the steps:


1. Go to YouTube and sign in: Head over to YouTube.com
and click ‘sign in’ in the top right corner of the page. Sign
in using your Google account username and password.
2. Go to YouTube settings: In the top right corner of the
screen, click on your profile icon and then the Settings’
icon.

3. Create your channel: Under your settings, you’ll see the
option to “Create a channel,” click on this link. Next, you’ll
have the option to create a personal channel or create a
channel using a business or other name. For this example,
let us choose the business option Now, it’s time to name
your channel and select a category.

Creating a proper YouTube channel is not a big deal, here is a
detailed guide to setting up a Youtube Channel .

Step 2: Add content
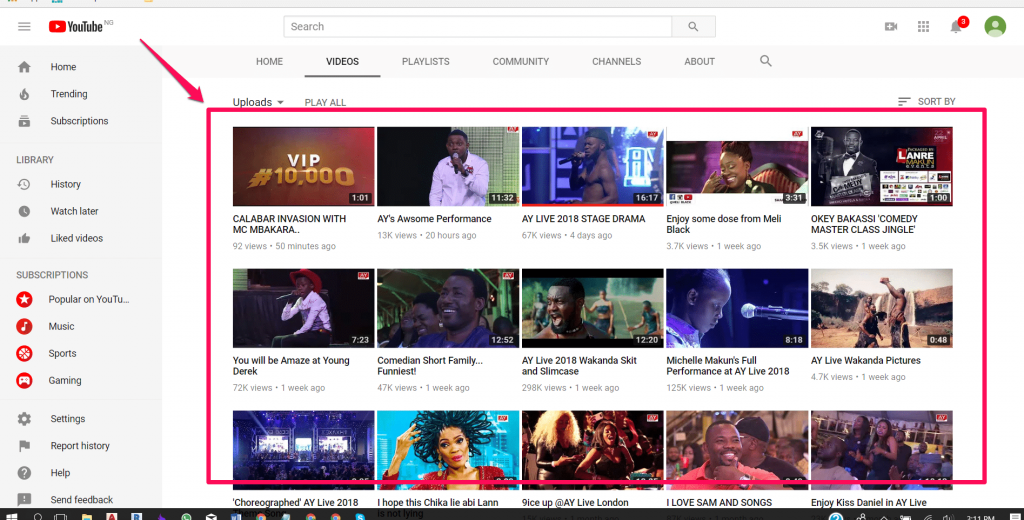


Try to upload content that is high quality, and isn’t super long.
(This option can vary depending on what type of content you
decide to upload).
Also, try to upload regularly and stay consistent with your
uploads.

Even if your content isn’t great at first, keep at it. Practice
makes perfect. Try to make each video better than the last.
You will often learn as you go.

Improve your content by either using a better camera or trying
better editing software or techniques.

Also, try to improve the way things are filmed. Use a tripod,
have a friend help you or light your scenes better. It all helps
for a better end product which in turn helps you get a better
audience.

By uploading regularly you can help hold an audience.
People are more likely to subscribe if you add content on
regular schedule, and maintain that schedule as much as
possible.

Make sure to tag your videos with keywords that describe the
content, as well as an eye-catching description. These will
help drive people to your video from YouTube searches.
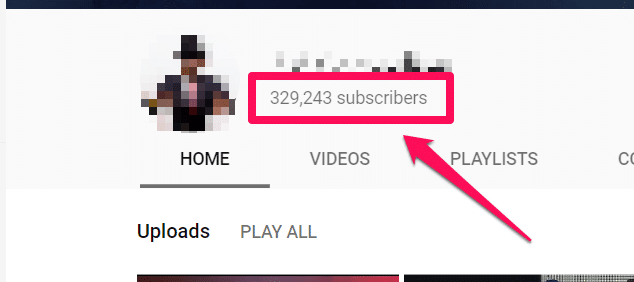


Building an audience is key to increasing your monetization.
You need people to watch your ads in order to make any
money off of them. There is no one secret to getting more
subscribers, just make the best content that you can and they
will come to you.

Keep uploading content and try to get people hooked. Send
your video out on Twitter and Facebook. Share it with people.
Distribute it elsewhere on the internet. Subscribers are
essential to becoming a partner.

Interact with your viewers by responding to comments and
making occasional videos directly related to viewer comments
and questions. Connecting with your community will bring
more members into that community.

Building an audience is key to increasing your monetization.


You need people to watch your ads in order to make any
money off of them. There is no one secret to getting more
subscribers, just make the best content that you can and they
will come to you.

Keep uploading content and try to get people hooked. Send
your video out on Twitter and Facebook. Share it with people.
Distribute it elsewhere on the internet. Subscribers are
essential to becoming a partner.

Interact with your viewers by responding to comments and
making occasional videos directly related to viewer comments
and questions. Connecting with your community will bring
more members into that community.

Step 4: Monetize your videos

In order to start earning money on your videos, you’ll need to
enable monetization. This means you are allowing YouTube to
place ads in your video. This also means that you
acknowledge that there is no copyrighted material in your
video.

1. Go to www.youtube.com and click “My Channel” on the
webpage.

2. Click the link called “Video Manager” on the top bar.
3. Click channel and Enable on monetization.
4. Get at 4,000 watch hours and 1,000 subscribers
Step 5: Get at least 4,000 watch hours to
start earning money.

You can monetize a video as it uploads by clicking the
Monetization tab and checking the “Monetize with Ads” box.
To monetize a video after it has been uploaded, open your
YouTube Creator Studio, select the channel drop-down and
click the Monetization to monetize your videos.
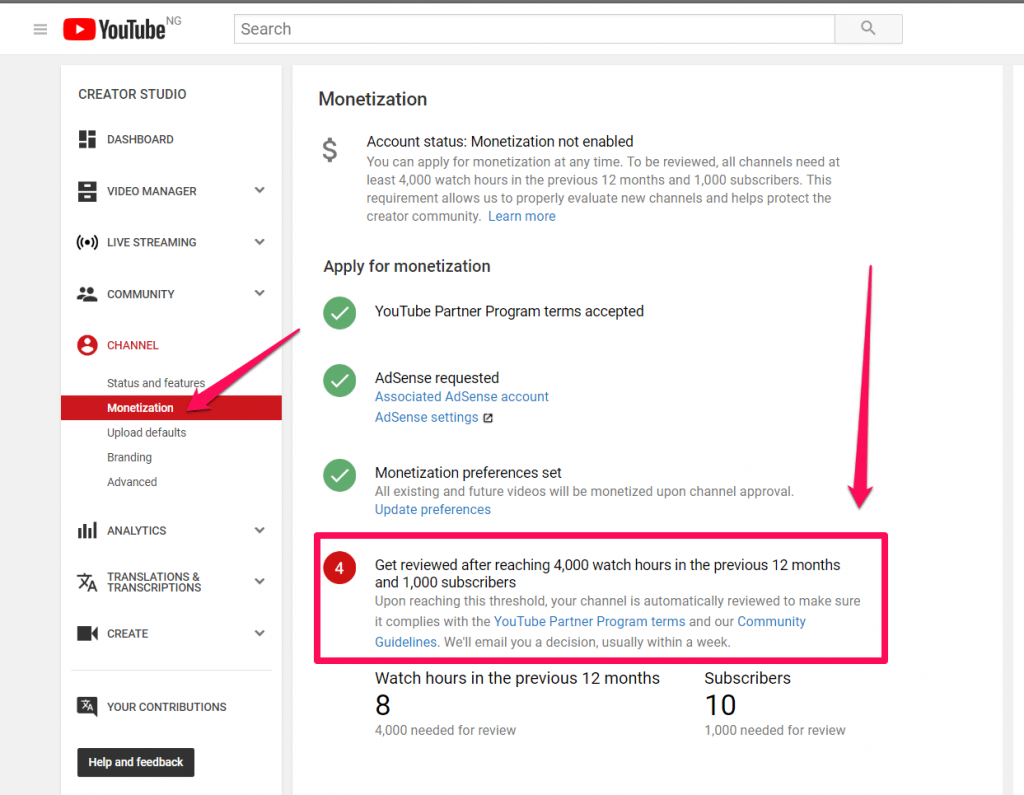


Get reviewed after reaching 4,000 watch hours in the previous
12 months and 1,000 subscribers

Upon reaching this threshold, your channel is automatically
reviewed to make sure it complies with the YouTube Partner
Program terms
and their Community Guidelines .

Youtube will
email you a decision, usually within a week.

Step 6: Set up Google Adsense


You can set up Google AdSense for free at the AdSense
website.

Click the Sign Up Now button to begin creating your account.
You must be 18 years or older to create your own account. If
you are younger than that, you will need an adult to help you.
You need either PayPal or a bank account and a valid mailing
address as well as other information so AdSense can verify
who you are and who to send the money to. You only gain
money per ad click and a smaller amount per view but it adds
up over time. This is why having an audience is key.

Step 7: Check your analytics


Once you have some videos online, monetized, and being
viewed, you can check out the analytics on them to see how
they are performing. Click the Analytics option in your Channel
menu.

Here you can view estimated earnings, ad performance, video
views, demographics and more.
Use these tools to see how your content is resonating with
your audience. You can change your content or your marketing
if you’re finding that you aren’t attracting the users that you
want to.

Step 8: Market your videos elsewhere


Don’t put your videos just on YouTube! Start a blog, make a
website or post them on other video or social media sites.

The more views it gets, the better. By sharing the link or
embedding the video on the internet, you are increasing the
chance of it getting noticed.

Step 9: Become a YouTube partner


YouTube Partners are YouTube members who have monetized
videos with a large number of viewers. Partners gain access to
more content creation tools and can win prizes for the number
of viewers they have. Partners also get access to much more
community support and tips.

You can apply for YouTube partnership at any time through the
YouTube Partner page.


In order to gain access to the most powerful Partner
programs, here is a guide:


sources :- https://digitalmarketingskill.com/make-money-on-youtube/

Thursday, 10 January 2019

How to Upgrade 2018 JAMB UTME

How to Upgrade 2018 JAMB UTME


Read This Before you Upgrade Your
2018 JAMB UTME Result


Following the release of the
2018 JAMB UTME Results,
we
have been receiving series of messages from our readers
whether they can upgrade their low UTME score to fit the cut-
off marks of their respective institution of choice.

Scam ‘artists’ too are sharing fake testimonies on how UTME
candidates can upgrade their score on forums, social
networking sites and every other means possible.

Before you pay exorbitantly to upgrade your 2018 JAMB UTME
result, you need to be sincere with yourself by answering this
simple question. If upgrading is possible, how many upgraded
results have you seen so far? I’m very sure there would be no
failure in UTME again if it’s possible to upgrade results.
The good news is ‘there is nothing like upgrading of UTME
results’.

These fraudsters have many formats of text they use, below
are some examples:

“ I just check my jamb result it was 160 so I was
hopeless I got mr frank number online I called MR
Frank and explain he help me to upgrade my score to
250 now I am happy if u want to upgrade ur score too
call mr frank on 081******** he is going to help u the
way he helped me God bless mr frank


‘ The 2016 UTME is out. Finding it difficult to
check? Then drop your REG. NO. here for it to be
checked for free….WITHELD Results and Results
below 180/200 can be upgraded to either 213, 235 or
249. For more information, candidates can call
070********only within the hours of 8am – 6pm or
add BBM pin:2******* to see samples of other
candidates UPGRADED results.

NOTE: Upgrading of results cannot be possible after
JAMB has sent list of its successful candidates to
their various institutions for POST UME.
THANKS


‘ All thanks to Mr Dele for helping me to upgrade
my JAMB last year if not for his help i would not have
been in school now,so to all jamb candidates if you
seek for a real jamb official who can help you
upgrade your jamb just contact Mr Dele On
081********


‘ Thanks to Mr David for helping me upgrading my
jamb he is very genuine if I can say he is a true helper
if u need his help call him on 081********
‘ Jamb Official”]This Is a Very Important
Information to all jambites who scored below
180. From our database, we found out that
there was a massive failure this year, so due
to this problem we are helping some students
in upgrading their jamb result, so therefore If
you are Interested in upgrading your Jamb
result, call office on 081******** Mr ola
Abuja.

You must have come across some of these messages before.
Whenever you see anything like upgrading, please don’t even
try to reach these people for assistance. They are coward and
lazy individuals who want to syphon your hard-earned money.
Some candidates have called us already to assist them with
upgrading and our response to their demand was ‘it’s
impossible’.

Don’t become a double loser by paying between N5,000 to
N10,000 to scammers to upgrade your UTME result, and at the
end nothing would be done.

Settle with your score. If you believe you deserve more than
what you had, go and SUE JAMB (lol).

Use the comment section to share your experience with the
upgrading of JAMB UTME results issue.


sources :- https://www.myschoolgist.com/ng/upgrade-jamb-utme-result/

Wednesday, 9 January 2019

Miracle Box Latest Setup V2.89

Miracle Box Latest Setup V2.89


Miracle Box Latest Setup V2.89


You can easily Download and Install Miracle Box
Latest Setup Update from below in just single click,
this is Miracle Box tool is very helpful in resolving bulk
of issues from android devices including flashing
device, Repair IMEI, Unlock SIM Network, and Reset
FRP of all Android devices, you only have to download
this tool and follow rest instruction from the tool to
solve your issues. Follow below step to Download
Miracle Box Latest Setup and Install it.


1- Miracle Box Latest Full Setup
v2.89:
Download

Mirror


If you Are Using v2.88 Then Download Only
Update And Extract To C:\Miracle Team
\Miracle Thunder Folder
Download V2.89
Update Only


2- Miracle FRP Tool v1.29
(New):
Download


3.Miracle Vivo Tool v4.07
(New):
Download


4- Miracle Moto Tool
v2.01 :
Download


5- Miracle Emmc Tool
v3.07 :
Download


6- Miracle Huawei Tool
v2.11:
Download


Miracle Box V2.89 Thunder Edition !


Millions of Mobile Support
# Connect Auto CPU
# Connect Model Wise


What is the use of Miracle Box?

Day by Day Chine mobile phone market is increasing
All in one Packet Solution (You can say Truly for China
Mobile)
One Complete Box for China Mobile Repair.


What is Fuzzy Logic Technology?

Fuzzy Logic Technology is famous in a combination of
Hardware and Software, this technology does not
depend on Database, sometimes it uses its own
function for checking what the problem came in an
electronic device, it changes its own signal/function
according to the problem accrued, which not need
every time to update software database.


Why Miracle Box Is Good
This is the latest technology Based (Fuzzy Logic)
It’s a User-Friendly work on Single Click.
Auto Detection no needs to tell which CPU have in
your Mobile.

No Need to update daily Just Press Single Update
Button.

Miracle Box has Biggest CPU Data Library.
It Comes with Multilingual.
Our Teamwork Round the clock for support to our box
and customers.


Whats I New In Miracle Box
V2.89 Setup


[X] Release Note MIRACLE Box & Miracle Thunder
V2.89

1. MTK Add Meizu Preloader Port Support.
M2Note/M3S/M5S/M5/M5C/M5Note/U10/U20.
2. MTK Improve MEIZU Support.
3. Qualcomm Add Auto identify UFS and EMMC.
4. Qualcomm Add MI Prevent Relock(ADB) In ADB
Mode.
5. Qualcomm Add MI6, MIUI10 Unlock Account ID.
6. Android Improve MI Disable Account.
7. Fix Some Bugs
8. Add 120+ Models MTK & Qualcomm Add News
Models Support.


Alcatel OT-5045T
MI 1S (3G)
MI 1S Youth (3G)
MI 1SC (3G CTC)
MI 2 (3G)
MI 2C (3G CTC)
MI 2A (3G)
MI 2S (3G)
MI 2SC (3G CTC)
HM 1SC (3G CTC)
HM 1SW (Duos 3G)
MI 3W (3G)
MI 3C (Dual 3G CTC)
HM Note 1LTEW (LTE CHU)
HM Note 1LTETD (LTE CHM)
MI 4W (3G)
MI 4 (LTE CHM)
MI 4 (Dual 3G CTC)
MI Note (Duos Lte)
MI Note (Duos Lte CHM)
MI Note (Dual Lte)
HM Note 1LTEW (Duos Lte CHU)
MI 4 (LTE CTC)
MI 4 (LTE CHU)
HM 2 (Duos Lte CHU)
HM 2 (Dual Lte CTC)
HM 2 (Duos Lte CHM)
HM 2A (Duos Lte CHM)
HM 2 Global (Duos Lte SA)
HM 2 Global (Duos Lte)
HM Note 1S (Dual Lte CTC)
HM Note 1S (Duos Lte CHM)
HM Note 1S (Duos Lte CHU)
HM Note 1S (Duos Lte CHM)
HM Note 1S (Dual Lte CTC)
MI 4I (Duos Lte)
MI Note Pro (Duos Lte)
MI Note Pro (Dual Lte)
Redmi Note 3 (Dual Lte)
Redmi Note 3 Global (Duos Lte)
MI 5 (Dual Lte)
MI Note 2 (Dual Lte)
MI 4C (Dual Lte)
MI 5 (Dual Lte)
MI 5S (Dual Lte)
Redmi 3 (Dual Lte)
Redmi 3 (Dual Lte)
MI 4S (Dual Lte)
MI Max (Dual Lte)
MI Max (Dual Lte)
MI Max Prime (Dual Lte)
Redmi 3S (Dual Lte)
Redmi 3X (Dual Lte)
Redmi 3X (Dual Lte)
Redmi 4 (Dual Lte)
MI 5S Plus (Dual Lte)
MI MIX (Dual Lte)
Redmi 4 (Dual Lte)
Redmi Note 4 Global (Duos Lte)
Redmi Note 4X (Dual Lte)
Redmi Note 4X Global (Duos Lte)
Redmi 4X Global (Duos Lte)
Redmi 4X (Dual Lte)
MI 6 (Dual Lte)
MI 5X (Dual Lte)
MI-ONE (3G)
MI-ONE C1 (3G CTC)
Cherry Flare S7 Deluxe
Cherry Flare S7 Lite
Cherry Omega Lite 4
Cherry Flare J1 Lite
Blu A030U
Blu A270a
Blu D600
Blu S0350WW
Blu S0390WW
Blu S0410UU
Blu S0450WW
Blackview A20 Pro
Blackview A30
Blackview BV5800
Blackview BV5800 Pro
Dexp ML350
ATTILA P10
Leagoo KIICAA POWER
Magnus Bravo Z25
Accessgo Gotune 3i
NGM E450
NGM E506
Xtouch Z1 Plus
MAJESTIC CRONO 54
VIP8 OST P501
QMobile LT100
VodaFone 320
ZTE Axon Z999
Oneplus 5 (A5000)
ZTE Axon A2018
Cloudfone Thrill Boost
Cloudfone Thrill Boost 2
Cloudfone Thrill Plus
Cloudfone Thrill Power N
Cloudfone Thrill View
Dexp BL250
Dexp BS450
Dexp T155
Dexp Z250
Doogee T5S
Doogee X55
Doogee BL5500 Lite
Doogee BL9000
Doogee S55
Elephone P8 3D
Fero A4501
Fero Pace 2
Fero Pace 2 Lite
Haier A6
Haier P10
Haier A41
Haier T51
Haier T53P
Itel IT1460
Infinix X5514 Smart 2 Pro
Infinix X5515 Smart 2
Leagoo Lead 1
Leagoo Lead 1i
Leagoo Lead 2
Leagoo Lead 2s
Leagoo Lead 3
Leagoo Lead 3i
Leagoo Lead 3s
Leagoo Lead 4
Leagoo Lead 5
Leagoo Lead 6
Leagoo Lead 7
Leagoo Lead 8
Leagoo M9 Pro
Leagoo Power 2
Leagoo S9

sources :- https://www.mobilerdx.com/2018/08/miracle-box-latest-update-download.html

Monday, 7 January 2019

How to Create Facebook Application for a Website?

How to Create Facebook Application for a Website?

Creating a Facebook app and
website promotion


When it comes to SMM promotion, it is
desirable to create a Facebook app for your
website which will enable you to monitor
content which you published on Facebook.
This tutorial is aimed at helping you create a
Facebook website application and connect it
with web pages via Meta tags of the Open Graph
Protocol, thus monitoring important metrics of
your website.

Monitoring the metrics is a very important step if
you are using paid content promotion, so that
you get a clear insight into the number of people
who saw your content, whether they liked it or
not, and how many times the target group and
users have shared it, i.e. the way they have
interacted with it.

As opposed to classic “share” buttons and other
content- and page-sharing options, a Facebook
app will monitor all likes and shares on profiles
and profile walls where the URL of the website
for which you have created the app appears, and
which also communicates and collects data
from the very web page via the Open Graph
Protocol.


Creating a Facebook App: Step-by-Step
Guide


The first part of this tutorial is dedicated to the
process of creating a Facebook app in 10 simple
steps, whereas the second part is dedicated to
analytics and metrics of a created Facebook
app.
Follow these simple 10 steps in order to create
a Facebook App:


Log into your developer account
The first thing you need to do in the process
of Facebook App creation is to log into your
. This account
is the same account you have used to
create your company’s Facebook page.

Create new Facebook app
Click the “Create new Facebook App” button
in order to start the process. If you do not
see the button in the right header corner,
click on the link to “Register as Developer”.

Choose platform
Next, choose a platform you wish to add
your App to (iOS, Android, Facebook Canvas,
website). If you are making an app for many
different platforms, you can add them to
your Facebook App later.

Choose a name
Choose a name for the app and select
“Create New Facebook App ID”, and then
choose the appropriate App category in the
“Category” field. However, if you are making
a test version of your App, you need to
select the Test App option.

Follow Quick Start steps
Read Facebook’s Terms of Use and accept
them. After you have done that, click the
Continue button and proceed to the next
step. If needed, verify your profile.

App ID
After you have successfully completed step
5, a unique identification number will be
added to your App (App ID), which will
enable you to use it on your website by
adding the Open Graph Protocol of the Meta
tag for content sharing (you are going to
need this to get an insight into statistics and
metrics via the App).


Your App’s ID can be easily accessed via
your .

Protect your app secret
Facebook App will automatically generate a
secret code which is connected with your
App. Its purpose is to authenticate demands
from the application towards Facebook
servers. This code is also used as a
password.

Contact email
You will have to enter necessary
information, which you can find in the
“Settings” field. This step is aimed at
entering basic data into the App, such as
email address, App name and name
confirmation (Step 2).

App details
Select “App Details” in the left section and
find and change additional information
about the app. Enter website’s domain name
into the “App Domains” field
(www.example.com). If you want your App to
be listed in the “App Center”, turn the “App
Center Listed Platform” option on for a web
or mobile site. Add icons, promotional image
and video. Make sure that you are following
all “App Center” terms of use so that your
App can be approved.

Disable development mode
After you have created the App, it will be in
the development mode, which is its default
option. Once you have your app ready for
publishing and public usage, you can change
its development mode into public, thus
allowing it to communicate and gather data
from Facebook profiles which are not
connected with the app itself.


Insight into Facebook app analytics
and metrics

You can get a full insight of analytics and
metrics, as well as the manner of which
Facebook users have communicated with the
App and on which devices, in the “Facebook
Analytics for Apps” control panel.


copyalright:- How to Create Facebook Application for a Website?"

Monday, 31 December 2018

How To Use Three Different Passwords On One Facebook Account

How To Use Three Different Passwords On One Facebook Account

Do You Know That You Can Login To Your Facebook Account
Using Three Different Passwords? Unlike Any Other Social
Network Which Has Only One Password To Access, Facebook
Lets You Login Using Three Different Variants Of Your
Password. Facebook Accepts The Following Forms Of Your
Password.


1. Your Original Password: This Is The Password You Created
During The Sign-up Process. Assume That Your Default
Facebook Password That You Created During The Sign-up
Process Is "myFacebookPass"

2. Password With The Case Toggled: In The Above Password,
The Letters "F" and "P" Are In Uppercase And The Remaining
Are In The Lowercase. If You TOGGLE The Case Here, All The
UPPERCASE Characters Are Converted Into The LOWERCASE
And Vice Versa. Your Default Password "myFacebookPass"
Would Become "myfacebookpass". Now If You Login Using
The Above Toggled Password, Facebook Will Accept It. This Is
The First Variation Of Your Default Password Which Is
Accepted By Facebook.

3. Password With The First Letter Capitalized: If The First
Character Of Your Password Is In The LOWERCASE, You May
Just Change That First Letter To UPPERCASE And Facebook
Will Again Accept It And Let You In. As In The Case Of The
Above Example Where Your Default Password Is
"myFacebookPass", If You Just Change The First Letter To
UPPERCASE, Your Password Would Be "MyFacebookPass".


Note : The 3rd Option Works For Mobile Users Only.
Why 3 Passwords?? Now, You All Know That Facebook Can Be
Accessed Using Three Different Passwords. It's Just An Option
Provided By Facebook Itself To Make The Sign-in Process
Easier For Users. The Most Common Reason For The
Authentic Logins To Be Rejected Is When The CAPS LOCK Is
ON. This Is Where The First Variation Comes In Handy. That
Means, When The CAPS LOCK Is ON, The Case Gets Reversed
(Toggled) For Your Password But Facebook Will Accept It. In
Case Of Mobile Phone Users, It Is Common For The First
Letter Of The Password To Get Capitalized Which Often Leads
To Login Failure. So In Order To Tackle This Issue, Facebook
Will Also Accept The Password Where Only The First Letter Is
Capitalized. Thus If The CAPS LOCK Is Accidentally Enabled,
The Toggled Password Feature Would Still Let You Log In To
Your Account.

Sunday, 23 December 2018

Yadda Zakai Register Trader Moni Na 10k Nanda Ake Badawa Da Kanka

Yadda Zakai Register Trader Moni Na 10k Nanda Ake Badawa Da Kanka


Yanxu Inaga Basai Munyi Wani Dogon
Rubutu Ba Domin Nasan Mafi Yawancin
Ku Kunsan Wannan Tsarin Na
Trader Moni


Sanin Kanku Ne Wannan Hanyar Yin Reg
da Ta Shafin Yanar Gizo Ne Akeyin Sa
Don Haka Ga Wani Sabon Codes Wanda
Zaku Gwada Domin Ba, a San Inda Za, a
Daceba


Dial *540*256*14#


Amma Kusani Shima Wannan Suna
Charge N10 Duk Dadai Daga Bayane Suka
Fara Charge da Free Ne Akeyi Ta Hanyar
Codes


Sannan Kusani Be Cikayi a MTN ba
Yafiyi a Sauran Layi Kan Kamar Su
Airtel 9mobile Glo
Kuyi Share Domin Wasu Suqaru
YADDA ZAKAJI HIRAR DA BUDURWARKA TAKEYI YAYIN DA WANI YA KIRATA A WAYA BATARE DATA SANIBA

YADDA ZAKAJI HIRAR DA BUDURWARKA TAKEYI YAYIN DA WANI YA KIRATA A WAYA BATARE DATA SANIBA

SHIN KOKASAN ZAKA IYA
SAURAREN HIRAR DA
BUDURWARKA TAKE IDAN WANI
YAKIRATA AWAYA BATAREDA
TASAN KANAJIBA???


nasan abin
zakujishi da ban mamaki sosai
amma indai kun nutsu kunyi
yadda nace kuyi zaku iya.


YADDA ZAKUYI AIKIN


kasamu
wayar tata kokuma wayar
wanda kakeso kaji hirar tasa
kawai sai ku danna
**67* sai
lambar wayarka sannan #
misali
**67*08067xxxx#
sai kayi send.


shikkenan duk
wanda yakira wayarta zatayi
ringing a wayarta bayan wasu
en lokuta sai kaima kiran
yashigo wayarka to amma
karka daga kadan jira ta daga
da kanta daganan kawai sai
kara a kunnenka zakaji duk irin
hirar dazasuyi batareda sunsan
kanajinsuba
DOMIN FITA DAGA
TSARIN danna ##67# amma ka
tabbata wayoyinku da kudi da
taka da tatan.